

Welcome to the Abbotsleigh Bring Your Own Device (BYOD) support site, designed to provide up-to-date information and resources for the School’s BYOD program. The site contains clear information about purchasing a laptop, setting it up for home, onboarding it to be ready for school, as well as support details if required.
Steps 2 and 3 are very important in setting up the laptop correctly. To assist with this, there are detailed instructions and video tutorials available in context and in the Resources section. If you have any concerns about Steps 2 and 3 please contact the Abbotsleigh IT Service Desk for assistance. Contact details can be found on the Support page.
Please click on the links below to go to each section.
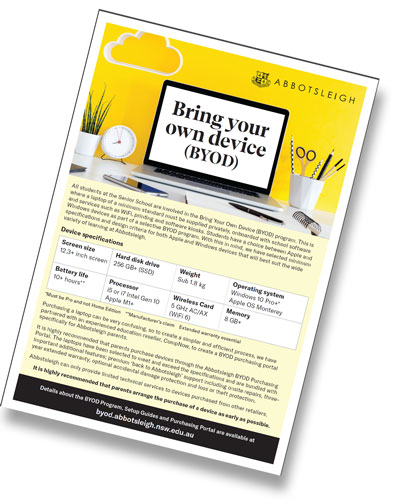 BYOD Flyer
Step 1: Buying a laptop
Purchasing a laptop can be very confusing, so to create a more streamlined and efficient process we have partnered with an experienced education reseller, CompNow, to create a BYOD purchasing portal specifically for Abbotsleigh parents.
It is highly recommended that parents purchase devices through the Abbotsleigh BYOD Purchasing Portal. The laptops have been selected to meet and exceed the specifications and are bundled with important additional features; premium Back-to-Abbotsleigh support including onsite repairs, three-year extended warranty and optional accidental damage protection and theft protection.
Abbotsleigh can only provide limited technical services to devices purchased from other retailers.
Students may still choose to purchase a laptop from an alternate retailer or use a currently owned device that fulfils all areas of the following specifications however please note that Abbotsleigh can only provide limited technical services to devices purchased outside of the Abbotsleigh BYOD Purchasing Portal.
Device specifications
|
Screen size 12.3+ inch screen |
Hard disk drive 256 GB+ (SSD) |
Weight Sub 1.8 kg |
Operating system Windows 10 Pro+* Apple OS Monterey |
|
Battery life 10+ hours** |
Processor i5 or i7 Intel Gen 11+ Apple M1+ |
Wireless Card 5 GHz AC/AX (WiFi 6) |
Memory 8 GB+ |
** Manufacturer's claim
Extended warranty essential
www.compnow.com.au/abbotsleigh
Step 2: What do I do next?
Once you have your BYOD device there are some initial steps you need to complete. These include the following:
- Setup of a personal user account
- Creation of an Apple or Microsoft ID (Optional)
- Connection to your home WiFi.
Once the configuration is complete the device will be ready for your personal
use.
Please choose your device type (Apple Mac / Windows PC) below and follow the
instructions provided.
Please select a device below to get started:
Apple Mac
Now that you have received your new MacBook , follow the remaining steps to help you setup your own machine.
Remember!
This is your own personal machine so set it up how you would
like
to.

Windows PC
Now that you have received your new Windows laptop, follow the remaining steps to help you setup your own machine.
Remember!
This is your own personal machine so set it up how you would
like
to.
Step 3: Preparing your laptop for school (onboarding)
Abbotsleigh has created an onboarding process with the aim to make the preparation of the device as straight forward as possible so that it is ready for use at school. This includes the following:
- Software (Office, Adobe, SentinelOne)
- WiFi/Internet
- Printing
- Email.
Please select a device below to get
started:
Apple Mac
To start the onboarding process, go to https://abbotsleigh.jamfcloud.com/enroll/
on your Mac.
With this website open you may then
follow the instructions provided below.
To view printable instructions for onboarding your Mac, click here.
Windows PC
To start the onboarding process click here for your Windows PC.
To view printable instructions for onboarding your Windows PC, click here.
Software
Abbotsleigh provide a number of software applications for use by students on their BYOD
device.
These applications are available via the Abbotsleigh Software Centre once the
initial onboarding process has been completed in Step 3.
Antivirus is a mandatory
requirement of any enrolled BYOD device. This is installed automatically during Step 3 of
the onboarding process.
Essential software such as Office 365, SentinelOne Virus Protection and Adobe Creative Cloud will be made available during Step 3 of the onboarding process. Abbotsleigh also provides a number of other recommended applications which may be installed as required.
Resources
This page contains a collection of resources for the BYOD program.
Support
Purchasing Enquiries
The Abbotsleigh BYOD Purchasing portal has been facilitated by CompNow.
A dedicated sales
representative is available to provide Abbotsleigh Parents and Students with a personalised
purchasing experience.
Please contact CompNow for any purchasing portal related enquiries.
Joel Cooper
joel.cooper@compnow.com.au
02
9951 7979
Support at School
The Abbotsleigh IT Service Desk is available to provide support for parents and students as part of the BYOD program. For technical support on devices purchased through the Abbotsleigh BYOD purchasing portal, the IT service desk can provide a range of support services:
- Hardware Support
- Software Support
- Warranty Assistance
- Insurance Assistance.
Please note: Support for devices that have not been purchased through the Abbotsleigh BYOD purchasing portal will be limited to basic software support.
IT Service Desk
onlinesupport@abbotsleigh.nsw.edu.au
02
9473 7750
Operating Hours
Monday - 8:00am to 4:00pm
Tuesday - Friday 8:00am to
5:00pm
FAQ
I bought a device from the Abbotsleigh BYOD Purchasing Portal and it stopped working. What do I do?
Take it to Abbotsleigh’s IT Service desk for advice, we will assess hardware and software faults.
For issues that can’t be resolved by the IT Service Desk, we will coordinate warranty repairs and technical support with CompNow on your behalf. If you have purchased the optional ADP and Insurance the Service Desk can assist with lodgement of ADP repairs and insurance claims.
A loan device running Windows will be allocated for the time it takes for the repair.
I bought a brand new device from a retailer such as JB HiFi and it stopped working. What do I do?
Take it to Abbotsleigh’s IT Service desk
for advice, we can help with basic software issues.
For issues that can’t be resolved, parents
will need to go through the process of warranty or extended care (if any) with the
manufacturer or JB HiFi.
A loan device running Windows can be
requested for no more than two weeks.
It is expected that your device will be
repaired or a new device is purchased within the two week period and the loan device
returned.
I already have a laptop at home, can we use that?
As long as the device meets all of the minimum specifications and design criteria then you
could use it, however;
Only basic software support would be
available from the IT Service Desk
Issues related to performance cannot be
resolved
Age and condition of the device can
significantly impact the performance even if it meets minimum specifications
Battery life can be significantly reduced
by age
Warranty and support may not be available
from the manufacturer and could lead to extended down time
Connection to the Abbotsleigh network and
services is ‘best effort’ and cannot be guaranteed.
If my daughter is no longer at Abbotsleigh, what happens?
The software is associated to your
daughter’s computer account at the School, once this has been disabled you will no longer
have access and the software will automatically be uninstalled
The support programs purchased through the
BYOD Purchasing Portal remain with the device and are available directly through the
manufacturer. (onsite will no longer be available)
Can we buy a laptop from CompNow at any time in the future?
Yes, the CompNow Purchasing Portal will be open for any future purchases and is not time limited.